Introduction
Welcome to this guide to M6S! Please enjoy your stay!
The Mechanics chapter is here to help you understand in-depth how everything works, while the step-by-step is there to tell you what to do in what order. If you don’t want to read about everything, I suggest reading only the Step-by-step which contains links back to the Mechanics should you want to know more!
The Timeline chapter is there as a reminder of everything you’ll need to do in order. I kept adds phase as simply that for readability reasons ; else the timeline would be twice as long.
Happy reading! — Vicky.
Mechanics
Raid-wides
Mousse Mural, Ready Ore Not, both of which are a one-hit instance of damage and Pudding Party which is an Akh-Morn repeating stack damage.
Tank buster
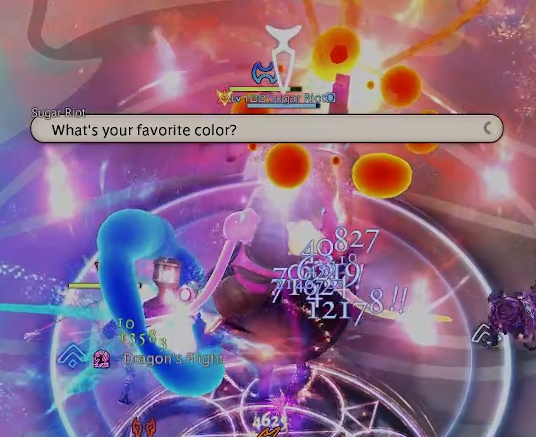
Color Riot
This tank buster is not aggro-based! It’s proximity-based. Make sure the group is standing on the targeting circle, while tanks are the farthest and the closest to the boss.
Everytime the tanks get hit by this, they get a colour debuff, killing them should they take the same colour twice.
While the boss is channeling, she holds one gun up. This is the colour the closest player will get hit by. The other gun will be the colour of the furthest player. Make sure to pay attention to which one you need to bait.
Wingedmark
This places a debuff on all players, throwing them a very long way forward at the end of the timer. You need to aim somewhere with a lot of space, and land close to where you need to be. There is usually a 2~3s delay before the next mechanic goes off, leaving you a bit to adjust.
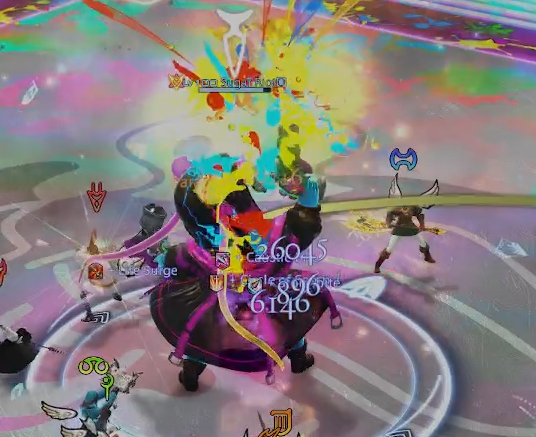
Colour Clash
This is a tell for either a light party, or a pairs stack.
- Two shots means light parties;
- four shots means pairs.
Double Style 1
The boss draws one figure with each pistol, each tethering to someplace on the arena where they will conjure said figure. The figures are as follow:
- Succubus: A very big chariot AoE;
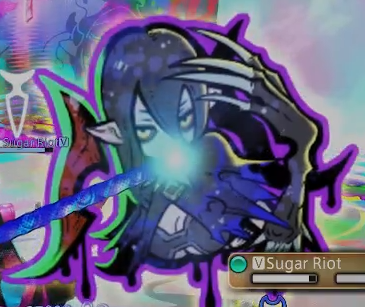
- Morbol: An arena-wide cleave (think Zodiark triangles);
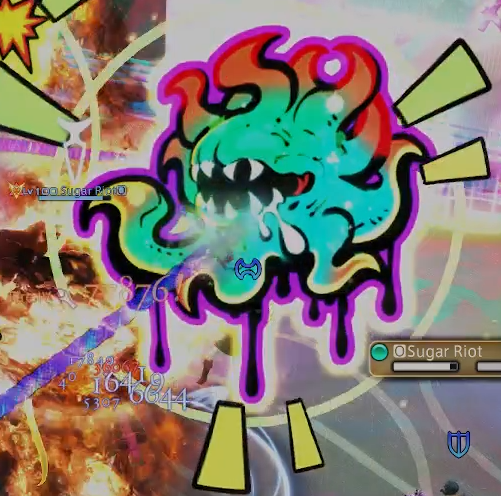
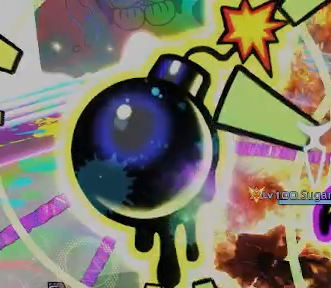
- Bombs: Spawn in lines of four, making one half of the arena unsafe;
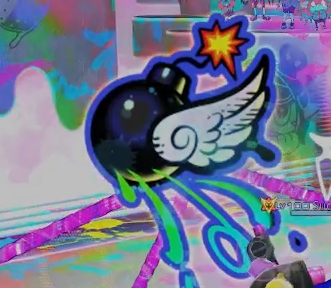
- Flying Bombs: Also spawn in lines of four, but they will jump forwards, making the other half of the arena unsafe.
Sticky Mousse
At the end of the cast, two random people will get targeted by a yellow AoE, marking all players hit with Mousse Mime. 5s later, this Mousse Mime will go off, detonating a light party stack.
Sugarscape 1
This first layer comes with a set of mechanics described in the Step-by-step, and 5 markers:
- 2 short timer defamations, on one DPS and the offtank;
- 2 long timer defamations, on both healers;
- 1 stack marker, with the same timer as the short defamations, on another DPS.
Left: Defamation, Right: Stack


Double Style 2
This Double Style will always be two sets of role-based bombs: 4 flying and 4 static. Our goal is to drown those bombs in the quicksand.
Do be careful:
- the bombs spawn with an AoE damage on the players, so you can’t stack them;
- the winged bombs jump forward according to the orientation of the player when they spawned.
Add phase
Yan
- Tanked by the offtank;
- Apart from the
Mus.
Mu
- Tanked by the main tank;
- Enrages after a long time, wiping the raid.
Gimme Cat
- Can’t be tanked
- Steals LB;
- Jumps around a lot.
Fether Ray
- Tethers to the first person to hit them;
- Periodically places
Waterpuddles under the tethered player, and hits them with a big vuln.
Jabberwock
- Targets one healer when it spawns, letting them know with a marker above their character;
- After a short while, the
Jabberwockbecomes targetable, starts slowly walking towards their target, and kills them should they reach; - It is vulnerable to stuns (and potentially other slowdowns).
Arrows
Very straightforward line AoEs that shoot in front of them.
Sugarscape 2
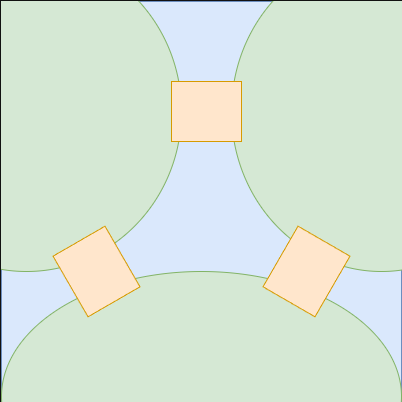
Same as normal mode, we have two smaller islands NE and NW, with a bigger one south; all connected with small bridges that go over the river.
Double Style 3
This one is always Arrows + either a Thunder spread or Fire stacks.
Same as normal mode: Thunder has to be spread outside the water, while the Fire stacks would have to be Light Parties in the water.
Thundercloud
A very big cloud that will periodically explode. Once after spawning, and every time it will reach the middle of an island after that. It will start moving either clockwise or anticlockwise after each explosion; so keep an eye on it at all times.
Yesad
The name is from the Sephirot fight because it works exactly the same way: we get a flash of lightning on our screen, signaling that our position has been snapshot and will be hit by an AoE shortly after.
Lightning Markers
Those markers will always target one support and one DPS. After a short while, they will be hit by a huge spread AoE, which will also electrify the whole Island they’re standing on. Kind of similar to Susano’s with a spread on top (and no stun).
Mousse Drip
Tragets the two furthest players with a Akh-Morn style marker. Don’t be afraid, those are not actual Akh-Morns. They can be stacked with only one other player and still do moderate damage. However, they leave puddles where they’re taken, so beware. This mechanic lasts for four hits (and thus four puddles) before it ends.
Moussacre
This spell targets the four closest players with thin cone AoEs. Just make sure to not overlap with anyone, and not bait those towards your ranged friends.
Step-by-Step
Phase 1
This fight starts with Mousse Mural, a heavy raid-wide with nothing special about it.
This is followed by the Colour Riot tank buster.
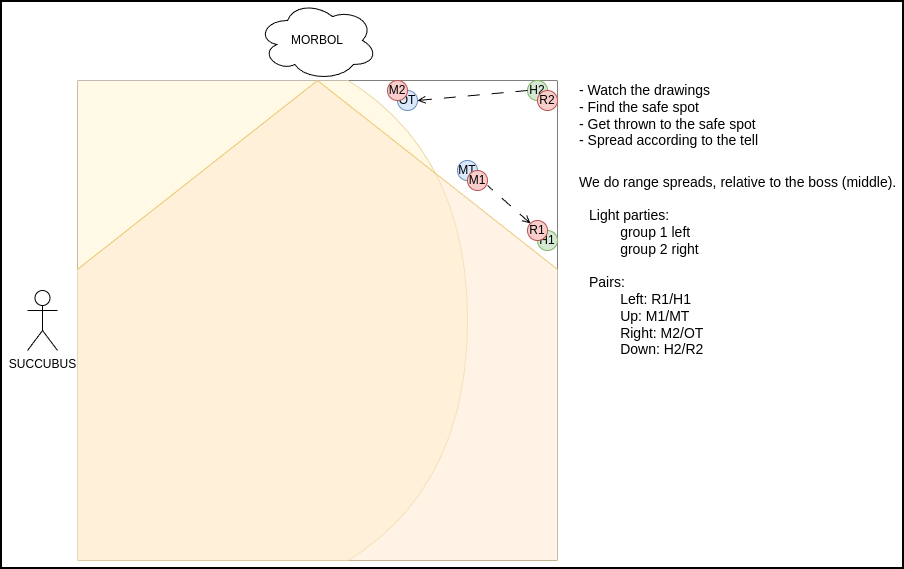
Next up we have Wingedmark, then the boss will cast Colour Clash; and finally Double Style. We need to find the safe corner of the arena from the AoEs, and make sure to get thrown inside of it by our Wingedmark debuff. Once we’re in it, we have about three secondes to join up for light parties or role stacks.
Here is an example of one possible pattern:
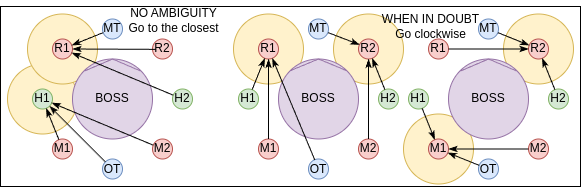
After this, the boss will do a Sticky Mousse. Make sure you spread in clock positions before the end of the cast to avoid more than one player getting hit by their AoEs. After this, we need to join up as light parties on top of the two players that were hit.
There is a lot of time to set up, we do it according to these priorities, but it’s pretty wingable should you want to.
After this, we get another Colour Riot tank buster. Tanks, be careful which debuff you already have.
Sugarscape 1
During this whole phase, you will have to deal with a very sizeable DoT (around 20k on non-tanks).
The first Layer that comes is Cactus dodging! This is very similar to the normal mode, except it goes way faster, and there are a lot more cacti. So get your sprint ready if needed. We’ve found that staying along the north wall for most of those dodges was pretty comfy, but it’s up to you to dodge wherever you feel.
Immediately after comes the first set of timers:
- two defamations spread in the corners (we do DPS east, Tank west);
- everyone else stay in the middle for the stack.
Then we get another Sticky Mousse, same as first time.
Then comes the second Layer: Quicksands! Stand in the middle for this one, and when the quicksand spawns, one corner will have a cactus in it, while the other 3 are safe. The party will go to the corner opposite the cactus, while H1 goes to the corner left looking to the cactus and H2 to the right.
After this, we go back to the middle, and get another quicksand on one random half of the arena as well as another Double Style. To resolve this, we spread in two lines, the role with static bombs stand in a line, directly inside the quicksand and the role with the winged bombs stand in a line outside the quicksand, looking in. It’s important to note that those bombs come down with a chariot AoE that does a lot of damage, so don’t stack and mitigate a lot.
We do our spreads relative to the quicksand, in the usual order : H1 MT OT H2 / R1 M1 M2 R2
Adds phase
After this, the boss will cast Mousse Mural, getting the platform back to its original state, and another Colour Riot tank buster. Then all hell [breaks loo](./mechanics.md#sugarscape-1se.
First add spawns
The boss will spawn one Gimme Cat, one Yan and two Mus.
- The
Yangoes to the off tank, who will keep it where it spawned; - the two
Mus go the main tank, which takes them along with the boss; - the
Gimme Catis a cat a thus does its own thing.
- As a caster, you can cast LB2 on the 5th pulsation of the adds’
Living Paintinganimation to get it off before theGimme Catsteals it! - Everyone focus down the Yan as fast as possible, with ranged DPS switching to the Gimme Cat when it’s clear the Yan will be killed before next adds spawn.
- Kill the Gimme Cat. Ideally this is done by ranged only as the Cat is jumping all around, but by grouping everyone on the Yak, we have a 7/8 chance of baiting it here for its AoE, allowing melees to give a hand!
Recap: We need to kill: Gimme Cat + 1 Yan; this leaves 2 Mus and the boss on the arena.
Second add spawns
On the second sets, the boss will two Mus more, and two Feather Ray.
- The two
Mus go to the MT, who tanks them with the boss and the other twoMus; - the east
Feather Raygoes to one of the healers; - the west
Feather Raygoes to one of the ranged.
- MT packs his posse on the healer’s
Feather Rayand everyone AoEs this group down. It’s adviced to save both burst and pots here to maximise damage; - once the first
Feather Rayis dead, the tank brings everyone to the otherFeather Rayand we continue AoEing them down with it.
Ranged, Careful ! You have to bait the Water puddles very carefully. They will stay on the ground for the rest of the phase. We bait them north to south along the east wall, with the first puddle being to the left of the corner, allowing you to bait the next one in the corner; aiming for a ]-shaped pattern in the end.
Recap: Kill: 2 Feather Ray; Left: 4 Mus + the boss.
Third add spawns
Here, the boss spawns one Yan, one Gimme Cat and one Jabberwock.
- The
Yangoes to the OT, who drags it north, away from all theMus; - the
Jabberwock’s target goes as far south-east as possible; - the
Gimme Catdoes its own thing.
- Everyone (except the OT) must focus the
Jabberwockas soon as it becomes targetable. This is always our highest priority. Coordinate the use of your stuns to kill it before it reaches its target! If the DPS is high enough, it’s good to have one player target theGimme Catearly instead of helping kill theJabberwock; - once the
Jabberwockis dead, we need to finish both theMus andGimme Cat, in this order; - there will be a
Ready Ore Notraid-wide around the time theJabberwockshould reach its target.
Recap: Kill: 1 Jabberwock + 1 Gimme Cat + 4 Mus; Left: 1 Yan + the boss.
Fourth adds spawn
On this last add spawn (finally), we get one Jabberwock, two Feather Ray, two Mus and one Yan.
- The
Yangoes to the OT, who tanks both of them north, alone and crying; - the west
Feather Raygoes to the caster; - the east
Feather Raygoes to the physranged; - those two will need to bait a lot of
Waterpuddles, so keep the[ ]shapes in mind. - the two
Mus go to the main tank; - the
Jabberwock’s target goes as far south as possible.
- First, we burn the
Jabberwockas fast as possible, again, use stuns to slow it down; - then ranged kill the
Gimme Catwhile melees focus on the caster’sFeather Ray. - finish the caster’s
Feather Ray; - kill the physranged’s
Feather Ray; - kill the
Mus; - the OT can finally rejoin the group! Kill their [
Yan](./mechanics.md#yans; Ready Ore Notraid-wide;Arrows;- you’re finally done!
Recap: You did it! Yay! Well, not really, the boss is still here.
Sugarscape 2
First, we get another Colour Riot tank buster, then the arena changes to its river version.
The first thing the boss will do is another Double Style. To maximise uptime, it’s best to tank the boss and an arrow crossing, to allow as much melee uptime as possible wether it’s stack or spread.
Next up, the boss will cast another Layer, making the former water unsafe and spawning a Thundercloud on one of the island. Immediately after this, we get a Yesad. Once the AoEs are baited, we run away from the Thundercloud, which will explode in a big AoE for the first time.
From then on, the arena will be hit by random lightning AoEs, so be on your toes and dodge as needed.
The Thundercloud will then start moving to its next location, and two players get targeted by Lightning Markers. The party will go to the bridge opposite to where the Thundercloud will end up, and the two markers will go to either side of them. We have the support go counter-clockwise from the group, and the DPS clockwise. This will repeat four times, until everyone has been targeted once.
Then we get a Pudding Party Akh-Morn before things get really chaotic.
After the raid-wide is over, we need to split up in three groups before the next Layer goes off, because the water will become lava and destroy the bridges, meaning we won’t be able to move around as we please. These are our positions:
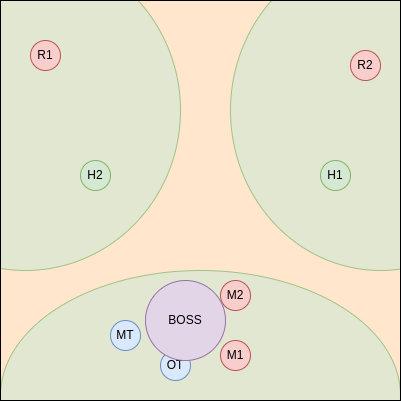
Then comes a series of mechanics, let’s go through them step-by-step.
First: Ranged players.
Mousse Drip: ranged DPS need to be the furthest players from the boss to make sure it’s baited onto them. Then, pair up with the healer and take the four hits without ever covering the towers or cutting your route to them.Moussacre: ignore this cast, it’s the melees’ job.Yesad: do not get inside your towers right away. Bait this first.Towers: once theYesadis baited, you’re free to take your tower.
Then: Melees.
Mousse Drip: unless you’re somehow further from the boss than the ranged, you don’t care about this mechanic.Moussacre: spread to the south of the boss to bait the cleaves.Yesad: do not get inside your towers right away. Bait this first.Towers: once theYesadis baited, you’re free to take your tower.
Finally we get another Wingmark, same as the first one, every player gets their own set of wings. On top of this, eight towers will appear: either 8 on the south platform, or 4/2/2 in any island.
Here are the two patterns and how to resolve them:
8 towers south
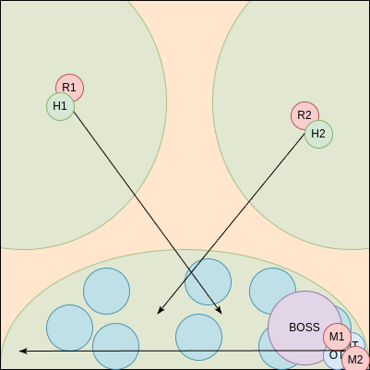
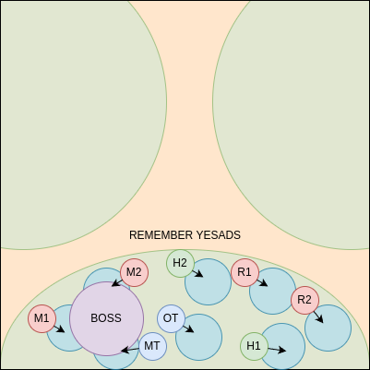
4 / 2 / 2 towers
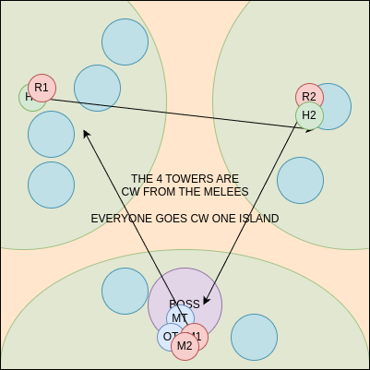
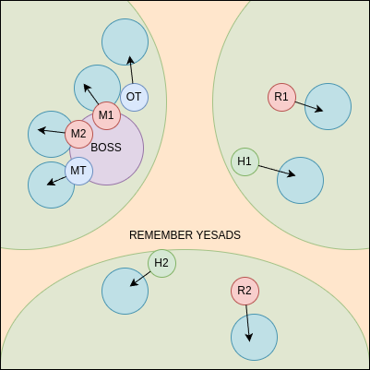
Beward of Yesads! We need to wait for the flash of lightning before stepping inside the towers.
Last stretch!
After all this, we finally get the Mousse Mural raid-wide that sets the arena back to its default state. Make sure the main tank goes back middle as fast as possible for the upcoming Sticky Mousse.
Next up we get another Colour Riot tank buster. Followed by a Wingmark + Colour Clash + Double Style combo. This is the exact same as the first Wingmark so we deal with it just the same.
And finally, Artistic Anarchy serves at this fight’s enrage, with Arrows, Morbols, Succubi and Flying Bombs all over!
That’s it! Hopefully this guide will have helped you though this fight. As usual, I’d be happy to receive any feedback on discord @vky. Thanks for reading and happy raiding! — Vicky.
Timeline
- Raid wide
Mousse Mural - Tank buster proximity
Color Riot - LP/Pairs tell
- Double style + jump
- LP/Pairs
- Spread then LP
Sticky Mousse - TB
- Arena change (drag the boss north)
- Cactus dodge
- Defamation 1 + Stack
- Sticky Mousse
- Quicksand 1 (cacti + defamations)
- Quicksand 2 (bomb baits)
- RW
- TB
- Adds phase
- Arena change
- Yesad
- Thunder spread/Fire stack
- Susano thunders
- Akh Morn
- Ranged bait
- Yesad
- Towers
- Jump
- Yesad
- Towers
- Sticky Mousse
- TB
- Double Style + jump
- Enrage
Full timeline available here, courtesy of ExiaKuromonji on reddit.