Introduction
Welcome to this M5S guide by vky ! It was made with information from world race streams, such as MrHappy’s, Arthars’ or Haruglory’s. I take no credit in finding out the fights or creating strats, I am simply trying to make it easier to learn !
I will try to keep this guide as up-to-date as possible if anything is wrong, or any better strat is found. So don’t hesitate to reach out @vky on discord if you find anything !
Have a good read, and happy prog !
Mechanics
Under construction.
Tank buster
Deep Cut. Targets the two highest agros and cleaves them.
Raid damage
Celebrate Good Times. Heavy magical raid damage.
Step-by-step
Beginning of the fight
For the first time in history, this fight begins with a r… TANK BUSTER ! It’s two cleaves on each tank.
Then follows a tell for either roles or light parties. Flip to A side means roles, Flip to B side means light parties. This won’t happen until the Drop the Needle cast.
Next up is X-snap Twist, the same mechanic as the normal mode, where the boss will cleave one side of the arena X times, then turn around and hit the other side. Only in this version, the cast is X-snap Twist & Drop the Needle instead. Which means immediately after the dodges, you will need to either group as light parties, or roles.
One more Flip tell, and Twist dodge.
Disco Infernal
After this comes a Celebrate the Good times raid-wide. Followed by Disco Infernal, which is another raid-wide that will also give us a Burn Baby Burn debuff, that will kill us if not standing in a spotlight at the end of its timer. The boss will also cast Funky Floor immediately after, which, just like normal mode, turns half the arena’s tiles periodically unsafe. The spotlights will appear at the same time the arena changes.
Here, the first thing we need to pay attention to is which spotlights are safe or not. The ones we want to remember are the unsafe ones. The spotlights always spawn on the same tiles, so it’s only a matter of looking at which ones have red under them.
Let’s have a look at one example:
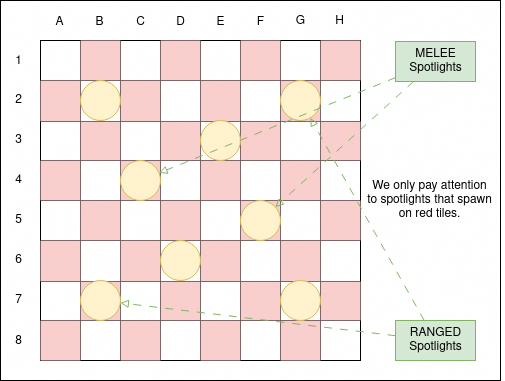
As the picture says, the only spotlights that are useful to us are those spawning on red tiles. For ranged players, this is it. Remember that tile and move on to the next paragraph. Melees however, you’re not off that easy. Instead of one, you need to remember two tiles: the one the spotlight spawned on, and the empty red tile next to it in the same intercardinal. Have a look below for the recap picture if you don’t see which I mean.
While the floor is getting crazy, the boss will cast either Outside in (in→out) or Inside out (out→in); telling you where he’ll hit, so to dogde it, just do the opposite of that. The in is exactly the hitbox while the out is max melee.
Then comes the tell for the next Drop the Needle and the first timers will expire. Because those timers are role-based and we can’t stand in the same spotlight, we divide the arena in two halves, north for group 1 and south for group 2. This is when the tile you remembered at the beginning will come into play! Melees, the shortest timer will have their spotlight on the second tile you remembered. The one that didn’t have the spotlight on it initially; then the longest timer will be on the first tile, the one that had the spotlight on it. Ranged, it’s the same for both timers. I told you we had it easy.
Let’s recap all this with one picture.
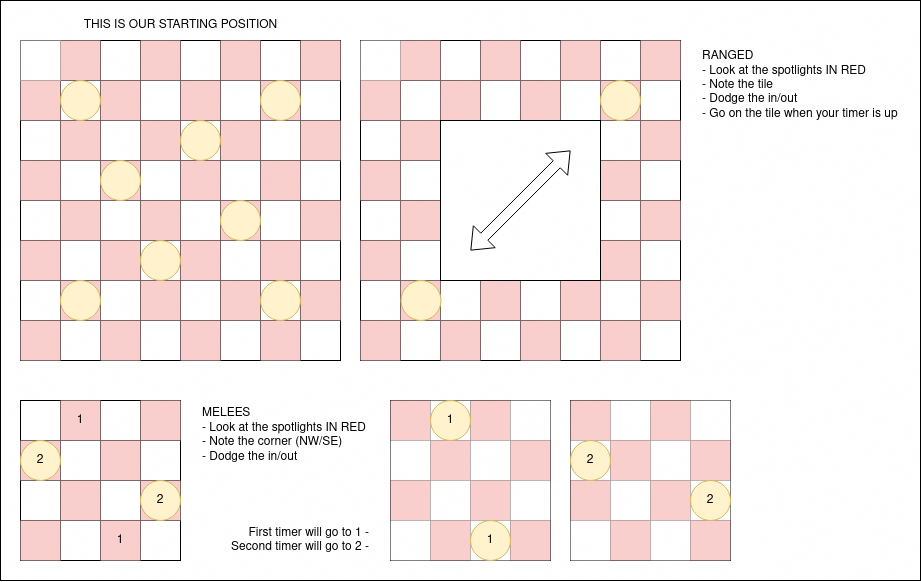
After this we get the Twist and Drop the Needle that was called during the Funky Floor, while the floor is still going on, so be careful to dodge both mechanics at the same time. It will however stop before the LP/roles stacks go off.
This is followed by a raid-wide and another Deep Cut tank buster.
Arcady Night Fever
This is a three-part mechanic happening all at the same time.
The first and easiest part is a series of eight outs then ins. They’re the same as the ones we’re used to, no funny business here.
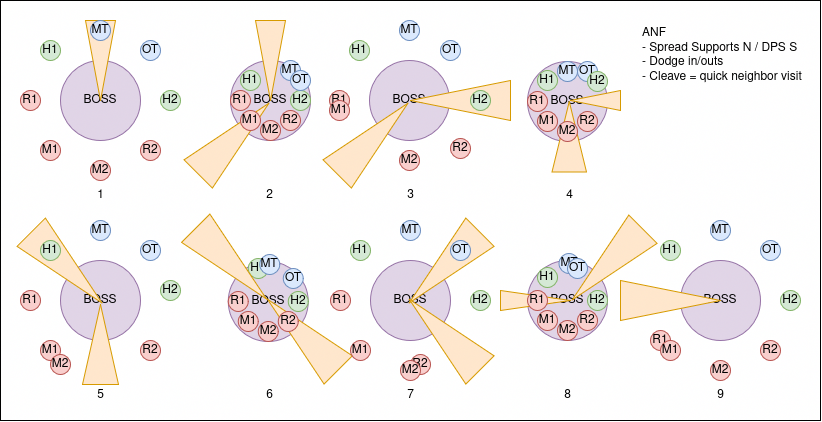
The second part is, every DPS and Support alternatively will get cleaved to the face, giving us either an α or β debuff with specific timers. These don’t really matter until they expire, so we have a bit of time before we need to worry about them. The cleaves themselves, however, will hit twice. The first time is targeted on the player, the second time will repeat the exact same AoE. With each motion of the in and out, one new player will be targeted by a cleave, always alternating between a DPS and a support, as the same time the repeat goes off.
To resolve this, we have all players spread around the boss — supports north and DPS south — going in and out as needed for the ins and outs. When you get hit, instead of dodging straight in or out, stack with one of your same-role neighbours for the next out or in; then get back to your normal position. This is only safe to do because the same role is never targeted twice in a row. Stack with the other role or linger with your friend one motion too many and you have a chance to die.
Here is a visual representation for it:
The boss will then cast Let's Dance, tethering to the frogs that spawned during Arcady Night Fever. The dodges are the exact same as normal mode, the twist is the α and β timers we’ve left alone until now. They will detonate in a very small AoE when their timer reach 0, killing the player unless they are standing with their equally-timed counterpart. This gives a magic vuln, so we have the pair doing the mechanic kiss in the middle, and everyone else be either north or south (watching them).
After this is a Let's Pose! giving the Perfect Groove buff to however did the dodges perfectly. It’s a damage buff.
Ride the Waves
The boss will first give us a Flip tell for the end of the mechanic, then begin casting Ride the Waves. Here we have group 1 take the west trench while group 2 takes the east trench, spreading like so:
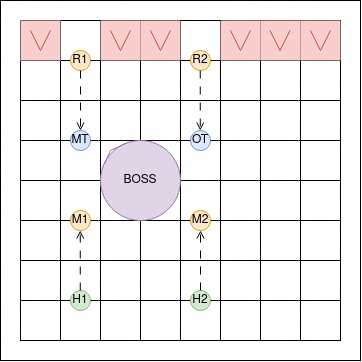
Eights Beats means spread, Quarter Beats means pairs. Ranged join up with their assigned melee when pairs are required. Be careful to follow along the wave during this mechanic.
The boss comes back to the middle and does another in/out out/in followed by another Twist and the Drop the Needle from the beginning of the mechanic.
After this, we get another Deep Cut tank buster, and Celebrate Good Times raid-wide.
Frogtourage 1
Like normal mode and P8S before it, adds will draw rectangles along the tiles on the arena. We need to find the two safe cardinals (always opposite to one another) and deal with another Eights or Quarter Beat. To find the safe spots, just look for the only two squares in the arena.
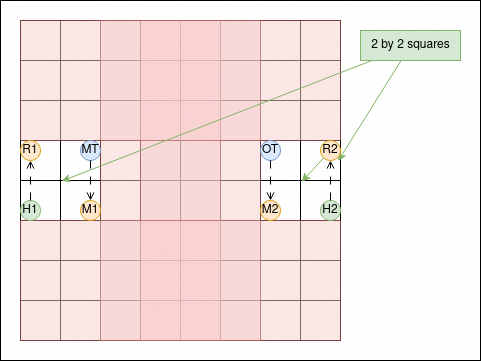
If the boss casts Eights Beat, we spread according to the diagram, otherwise supports join the DPS on their positions for pairs.
Disco Inferno 2
The boss starts by casting Disco Infernal, giving us the Burn Baby Burn debuff again. Same as last time, we have a role-based long or short timer.
Four Frog Dancers appear around the boss, while spotlights start sliding along the outside in the same spots as the first Disco Infernal (minus the close spotlights).
- Short timers need to take those spotlights immediately after their first movement;
- Long timers need to go next to those Frog Dancers and bait a thin proximity-base cone anywhere but in the short timers’ face.
Swap for the second debuff timer and pay attention to the tell for the next Drop.
Right after this, the boss will do the usual Snap and Drop the Needle followed by another Celebrate Good Times raid-wide.
Ensemble Assemble
We get another Arcady Night Encore, which is exactly the same as first time, except the α and β debuffs aren’t there. After this, the boss will cast Let's Dance! Remix, where the boss will once again tether to the background Frog Dancers, however this time they can point to any cardinal and they’re way faster, making the dodges more challenging. This is followed by another Let's Pose! cast that will award anyone who dodged perfectly with the Perfect Groove buff.
Frogtourage 2
Two sets of two Frog Dancers will spawn on intercards and start casting Do the Hustle, an half-arena cleave with a display at their feet — kinda similar to M1S or Mount Rokkon. Dodge the first set of two, then the second, then finally the boss’ cleave.
After this, we get another set of moonwalking Frog Dancers’ P8S mechanic mixed with the proximity baits from earlier. The positioning for this mechanic doesn’t look particularily demanding, so here is an example of what it could look like.
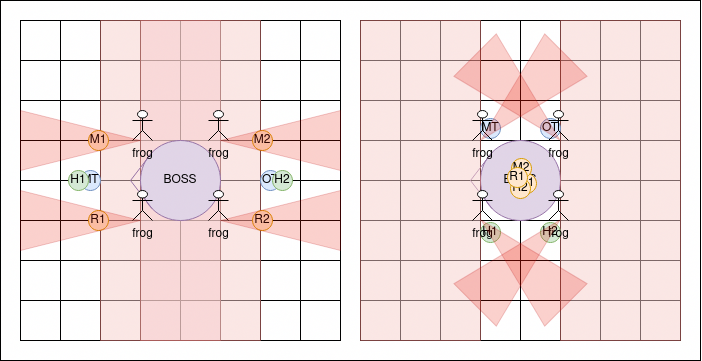
We have the DPS bait first arbitrarily, all that matters is not to bait two in a row.
We get another Do the Hustle with two adds and the boss all at the same time followed by the same old Deep Cut double-buster.
Funky Floor 2
We get the same alternating floor as first time. This time however, not as much going on, it’s just mechanics we’ve already seen. First is a Quarter / Eights Beats pairs or spread, for which we can use normal clock positions with supports joining the DPS as needed. Then it’s either Inside Out or Outside In. And finally the other Beats. As long as you pay attention to the floor changing, nothing too demanding.
This Funky Floor is followed by not one, not two but three Celebrate Good Times before one last Frogtourage Finale sounds the enrage.
That’s it !
Congratulation on making it to the end of this guide. Good luck ! — Vicky.
Timeline
Under construction.