Step by step
First phase
This fight, like most fights, begins with a raid wide, Thorned Catharsis.
This raid-wide is then followed by Shock. One of the roles will all get regular Ahk rais while all others get a brand-new donut Ahk rai.
Four one-person towers will spawn right after this attribution — always on the intercardinals.
We handle this by having donught Ahk rais take their colour-coded tower while the regular akh rais spread on their colour-coded cardinal. You will see a 3 seconds countdown in the form of a circle emptying above your head. My advice is to start moving at the count of one in the case of the akh rai, and to stop moving at the count of one if you have the donught instead.
Two tethers appear, targetting random players. Those should be taken by the tanks, baited away from the party and soaked with lots of cooldowns. They are your only tank buster for a while so you can go ham on mitigation.
Then comes Escelons' fall. This mechanic is pretty similar to M4S’ Witch hunt. The boss will display four prompts in a row, telling you which four players will be targeted by cone AoEs each time. These AoEs give a slashing debuff preventing you to take two in a row.
We handle this mechanic by having each player stand on their clock positions. The four DPS stand inside of the boss’ hitbox while the four supports stand max melee. Which group gets hit first doesn’t really matter as long as you pay attention to when you need to swap.
Here is an example of what it can look like:
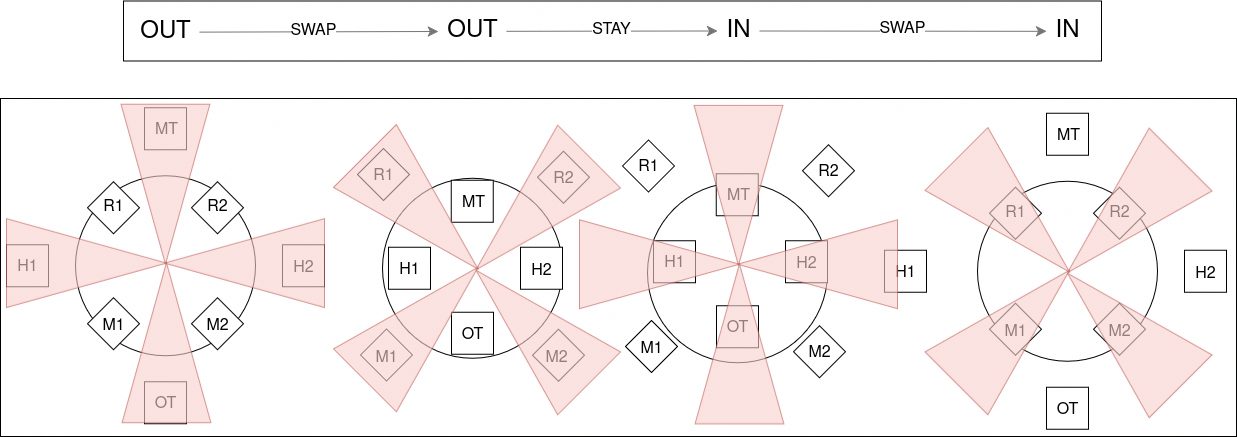
To put it simply: If the boss gives the same prompt twice in a row, you swap, if it’s two different prompts, you stay.
Immediately after this comes an Akh Morn, so group in the middle with some mitigation to soak this together.
Add phase
Four orb adds spawn in each intercardinal. They will slowly charge the boss’ gauge, leading to a wipe should it reach 100. This DPS check is fairly lenient, however the mechanics going on during it are very deadly; so I advice focusing on them rather than on damage.
After a short while, two players — one DPS and one support — will be tethered to one of two clones spawning on the outskirts of the arena. We know in advance that the eastern clone will target a DPS while the western add will always target a support.
Around the same time, two 3-player towers will spawn, always opposite to each other.
To resolve this mechanic, we group all DPS together and all supports together, giving each of them one half of the arena to soak all towers in. DPS taking east and supports west. Meanwhile, the two players targeted by clones need to hurry towards them. After approximately four seconds, the clones will snapshot their tethered players’ position and do a half-arena cleave in the direction their swords is pointing. You will need to bait those cleaves away from the arena, otherwise they will kill any non-tank standing in a tower, which will most likely result in a wipe.
The towers happen three times, while the baits happen four times. Be aware that even if finishing the phase early, the baits will resolve, so do these no matter what.
After all adds are killed, the boss will become targetable again, and cast a heavy raid-wide.
Third phase
The phase begins with an arena change from which point, the middle of the arena becomes a killzone. Walking in it give a DoT that will very likely be the end of you, so it is to be avoided.
Roseblood Bloom
This mechanic consists of a 3 way typhon that will rotate either clockwise or counter-clockwise. Each lit tile struck by those cones will explode, so you will need to rotate with the typhon while making sure to avoid walking on any of them. There will usually be only one starting position which will allow you to walk long enough without getting stuck. Here is an example of a pattern we got:
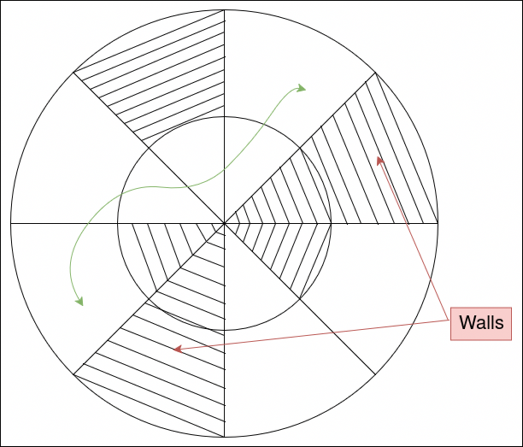
As long as you pay attention to where the “walls” are, you should be able to tell the starting zone fairly easily. Then it’s only a matter of rotating at the right speed.
After you’re done rotating, every player will get a spread. There is about five seconds to make sure every player are standing away from each other and on unlit tiles.
The arena then goes back to normal, followed by another Thorned Catharsis raid-wide; before the cast of the Roseblood: 2nd Bloom.
Roseblood: 2nd Bloom
The arena once again gets divided in tiles with the killzone middle dot. Then, the cast of Thunder Slash begins.
The boss will start displaying three sets of opposite cones as well as its tell for chariot → dynamo or dynamo → chariot.
This mechanic, despite being fairly easy in theory, is especially hard on the eyes. It gets very hard to distinguish what is going on, very fast. So I advice paying really close attention at the beginning of the mechanic, as soon as the floor changes.
This is what the arena will look like, note that it can be rotated any which way:
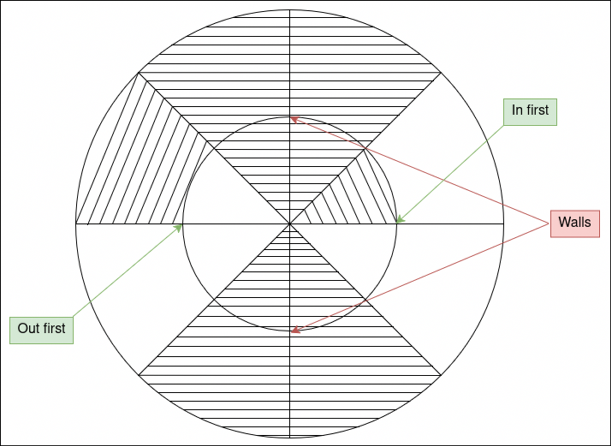
As soon as the chariot/dynamo appears, you can go to the appropriate side of the arena, in the only safe tile. After this, you will need to pay attention to the order the cleaves appear in so that you can dodge appropriately. I advice trusting your memory more than your eyes, since once every AoE display has appeared, you probably will not be able to tell what is what anymore.
Following this, the arena goes back to normal and the boss does another set of tank tethers.
Roseblood: 3rd Bloom
Again, the arena changes to its tiled version, with this one specific pattern:
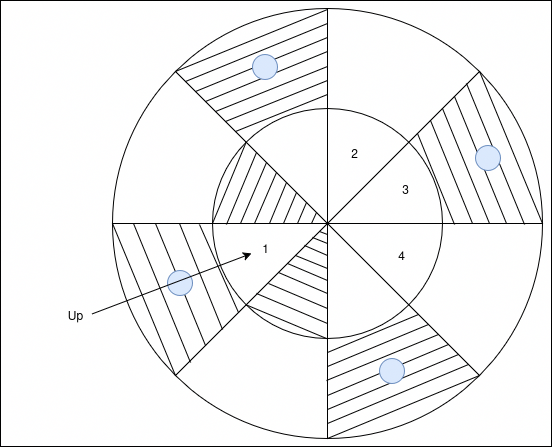
Again, this pattern can be rotated any direction, so pay attention to the gap in the inner tiles to determine our relative “Up” for this mechanic.
One of the roles will get rose markers, while the others get nothing. Those rose markers will light the tiles they are put on, and we need to make sure none of the rose towers end up connected. The only solution is to put all of those markers in the inner circle, one of them up, the other three down, down left and down right. Once this is done, the people who lit the tiles up can move away, while the other role soaks the four towers.
We use relative positions for this mechanic with respect to people’s usual clock spots, hence (numbers refer to the diagram above) for rose markers: MT → 1; H2 → 2; OT → 3; H1 → 4 or R1 → 1; R2 → 2; M2 → 3; M1 → 4. As for towers: MT → Up; H2 → Right; OT → Down; H1 → Left or R1 → Up; R2 → Right; M2 → Down; M1 → Left.
After this, the arena goes back to normal and we get another Thorned Catharsis raid-wide.
Escalons' fall 2
This time around, Zelenia will summon a clone before showing us her prompts for near and far baits. This clone will first do a shock, giving all of one role donut akh rais, then light party stacks.
To resolve the light party stacks, we have all donuts stack exactly on top of one another, on the boss’ hitbox circle, while the other role get ready to spread after their light party in order to bait the first hit of Escalon's fall.
Here, we spread the supports H1 MT OR H2 in the north, and R1 M1 M2 R2 in the south. Be very careful to pay attention to the prompts for Escalon's fall while the donuts and light parties go out; missing the first tell will very likely cause a wipe.
This mechanic is followed by another Akh Morn raid-wide.
Rosebloom: 4th Bloom
The arena will once again become tiled, and this time this will be the pattern we have to deal with:
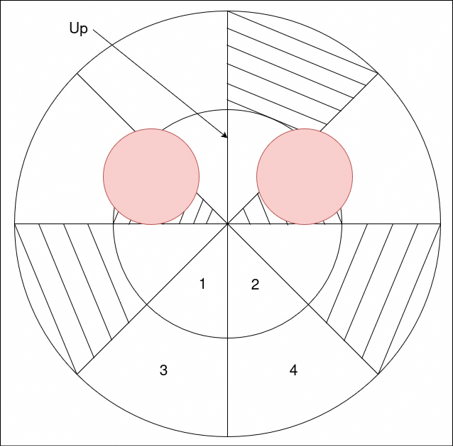
This time, two AoEs are already present on the arena, overlapping all the lit tiles in the upper half of the arena; while one of the roles will get rose markers. Should these markers connect the upper tiles to the lower tiles, the AoEs hitting the upper half would spread to the lower and likely kill a lot of people, so don’t do that. Instead, we have the melees light up the 1 and 2 tiles, while the ranges take 3 and 4.
The role that did not get rose markers will instead get spread markers. The very important part here is that those spread markers must not overlap with any of the lower tiles, or they will kill all the rose marker players (bad). So we have those spread markers go in the upper half of the arena, as far up as you can.
Immediately after this, the boss starts casting Encircling Thorns, which will tether the DPS with the Supports, followed by Alexandrian Banish III, an 8-man stack on one of the healers. The timing here is such that there’s no way for the group to re-join before the stack goes off — so instead, we’ll use the lit tiles’ property of extending mechanics, and have the healer targeted by the stack touch the lower red tiles with their stack (careful not to step inside the tile however) while the DPS run inside the lower tiles on their end so as to count as part of this extended stack !
This mechanic is followed by yet another Thorned Catharsis raid damage.
Escalons' Fall 3
This Escalons' Fall is the exact same as the first one, with one major twist: the boss will spawn two clones — one north, one south — before the prompts start. One of those adds will start casting Power Break and their sword will start glowing to indicate which side of the arena will be cleaved. This first dodge will have to be done during the Escalons' Fall cast. Then spread to your clock positions again to do the mechanic as normal; and finally do the second Power Break half-arena cleave.
Rosebloom: 5th Bloom
This phase starts with a double Valorous Ascention raid-wide,